Getting a flawless spray tan requires more than just showing up to your appointment. Proper spray tan prep is the foundation of achieving that coveted golden glow that looks natural and lasts for weeks. Whether you’re preparing for a special event, vacation, or simply want to maintain a year-round tan, understanding the intricacies of spray tan preparation can make the difference between a professional-looking result and a patchy, uneven mess.
The art of spray tan prep involves a systematic approach that begins days before your appointment and continues through the application process. Professional tanning experts recommend starting your exfoliating and hydrating routine about 3-5 days before your spray tan and carrying it through until the night before, ensuring your skin is optimally prepared rather than relying on last-minute efforts that often fall short of expectations.
The Science Behind Effective Spray Tan Prep
Understanding why spray tan prep matters requires knowledge of how tanning solutions interact with your skin. DHA (Dihydroxyacetone), the active ingredient in most spray tan formulas, works by reacting with the amino acids in the top layer of your skin cells. This chemical reaction produces the brown pigments that create your tan. However, this process is highly dependent on the condition of your skin’s surface.
Dead skin cells, excess oils, and product residue create barriers that prevent the tanning solution from adhering evenly. This is why proper preparation is crucial for achieving consistent results. When your skin is properly exfoliated and clean, the DHA can penetrate uniformly, creating an even color that develops naturally over the following hours.
The timing of your spray tan prep is equally important. Ideally, you should aim for your spray tan session to be 2 days before your big event, allowing enough time for the tan to fully develop, for any initial bronzers to be washed off, and for your skin to settle into its new golden glow. This timeline accounts for the development process and gives you time to address any issues before your important occasion.
Pre-Appointment Spray Tan Prep Timeline
5-7 Days Before Your Appointment
Start Your Exfoliation Routine: Begin with gentle daily exfoliation using a body scrub or exfoliating mitt. Focus on areas that typically accumulate more dead skin cells, including elbows, knees, ankles, and heels. Avoid aggressive scrubbing that could irritate your skin.
Begin Hydration Protocol: Start moisturizing your skin twice daily with an oil-free, fragrance-free lotion. Well-hydrated skin provides a smoother canvas for tanning solution application and helps extend the life of your tan.
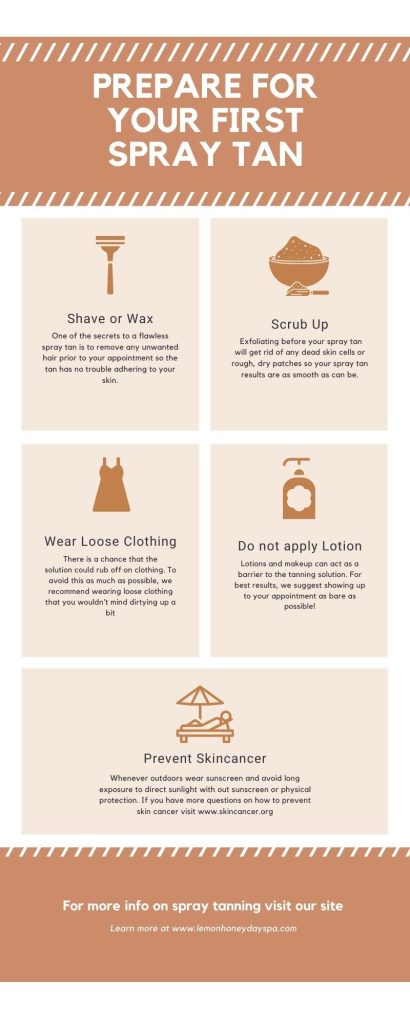
Schedule Hair Removal: Professional guidelines recommend shaving 24 hours prior to application, waxing at least 48 hours prior to application, and laser hair removal four to five days prior to a spray tan. This timing allows your pores to close completely, preventing the tanning solution from settling into open follicles and creating dark spots.
2-3 Days Before Your Appointment
Intensive Exfoliation: Perform a thorough full-body exfoliation using a high-quality body scrub. Pay special attention to rough areas like elbows, knees, and feet. Use circular motions and work systematically from head to toe.
Moisturize Strategically: Continue your hydration routine, but avoid areas where you plan to apply barrier cream on the day of your appointment. Focus on maintaining skin moisture without creating a barrier that could interfere with tanning solution adhesion.
24-48 Hours Before Your Appointment
Final Exfoliation: For best results, exfoliate your entire body 24-48 hours before your spray tan. This final exfoliation removes any remaining dead skin cells and ensures optimal surface preparation.
Hair Removal Completion: Complete all shaving at least 24 hours before your appointment. It’s important to shower 4-24 hours before your spray tan appointment, as wet skin or open pores may prevent the spray tan formula from adhering properly, leading to a patchy or discolored tan.
Avoid Certain Products: Stop using any products containing alpha-hydroxy acids, retinoids, or strong actives that could make your skin overly sensitive or affect tan adhesion.
Day-of Spray Tan Prep Essentials
Morning Preparation
Start your day-of spray tan prep with a lukewarm shower using a gentle, sulfate-free body wash. Avoid hot water, which can open your pores and potentially interfere with tanning solution application. Finish your shower with a cold rinse to help close your pores and prepare your skin for optimal tanning solution absorption.
After showering, resist the urge to apply any products to your skin. Products such as deodorant, perfume, oils, moisturizers, and makeup can contain certain chemicals that tan doesn’t like, leaving you with an uneven or patchy finish. These products act as barriers, preventing the tanning solution from properly adhering to your skin.
Pre-Appointment Checklist
- Clean, product-free skin: Ensure no lotions, deodorants, perfumes, or makeup remain on your skin
- Dry hair: If you’ve washed your hair, make sure it’s completely dry to prevent water dripping during application
- Appropriate clothing: Choose loose, dark clothing that won’t rub against your skin and cause streaks or uneven tanning
- Minimal jewelry: Remove all jewelry except small studs to prevent tan lines
- Barrier cream supplies: Bring barrier cream for your palms, nail beds, and other areas prone to over-absorption
Professional Spray Tan Prep Techniques
Barrier Cream Application
Understanding where and how to apply barrier cream is crucial for achieving professional-looking results. Apply a generous amount of barrier cream to your hands, focusing on the palms, knuckles, and areas where the skin is thicker. These areas naturally absorb more tanning solution and can appear darker than the rest of your body without proper protection.
Key Areas for Barrier Cream:
- Palms and fingertips
- Knuckles and finger joints
- Nail beds and cuticles
- Soles of feet and toes
- Ankles and heels
- Elbows and knees (light application)
- Areas with scars or blemishes
Positioning and Posture During Application
Your positioning during the spray tan application significantly impacts the final results. Stand with your feet shoulder-width apart and your arms slightly away from your body to ensure even coverage in all areas. Rotate slowly and steadily when instructed, maintaining consistent positioning to avoid overlap lines or missed spots.
Breathing Techniques: Practice shallow breathing through your nose during facial application to avoid inhaling tanning solution while still maintaining natural facial expressions for even coverage.
Common Spray Tan Prep Mistakes to Avoid
Timing Errors
One of the most frequent mistakes is poor timing of preparation activities. Rushing through exfoliation or moisturizing too close to your appointment can compromise results. Create a realistic timeline and stick to it, allowing adequate time for each step of the preparation process.
Product Interference
Scented products like lotions, creams, perfumes, and even deodorants can affect how your spray tan adheres to your skin. Many people underestimate how long these products remain on the skin, even after showering. Use only unscented, oil-free products in the days leading up to your appointment.
Over-Exfoliation
While exfoliation is essential, overdoing it can irritate your skin and create an uneven surface. Stick to gentle, consistent exfoliation rather than aggressive scrubbing that could damage your skin’s protective barrier.
Inadequate Hydration
Dry skin absorbs tanning solution unevenly, leading to patchy results. However, moisturizing too close to your appointment can create barriers. Find the right balance by maintaining consistent hydration while avoiding products immediately before application.
Advanced Spray Tan Prep Strategies
Skin Type Considerations
Different skin types require tailored preparation approaches. Dry skin needs extra attention to hydration and may benefit from longer preparation timelines. Oily skin requires thorough cleansing and may need additional exfoliation to remove excess sebum. Sensitive skin should use gentler products and avoid over-manipulation.
Seasonal Adaptations
Summer Prep: Focus on removing chlorine residue from pool activities and addressing any existing tan lines. Increase exfoliation frequency to account for higher skin cell turnover in warm weather.
Winter Prep: Pay extra attention to hydration, as heated indoor air can dry out skin significantly. Use humidifiers in your home to maintain optimal skin moisture levels.
Event-Specific Considerations
When preparing for special events, consider the timeline carefully. For the best look, spray tan two or three days before your event, allowing time for the tan to settle and for you to make any necessary adjustments.
Wedding Prep: Schedule a trial run 4-6 weeks before your wedding day to perfect your preparation routine and desired shade. This allows time to adjust techniques and ensures you’re completely comfortable with the process.
Vacation Prep: Plan your spray tan to be at its peak during the most important days of your trip. Consider that travel can affect tan longevity due to different climates and activities.
Post-Application Immediate Care
The Critical First Hours
Spray tans usually take 4-8 hours to develop, so try not to let your skin get wet during that time. This development period is crucial for achieving optimal color and longevity. Plan your day around this timeline, avoiding activities that could cause sweating or water exposure.
Clothing and Contact Precautions
Wear loose clothing after your appointment, as anything that rubs against your skin right after your spray tan will disrupt the tan’s development. Some people go to extremes, avoiding even bras or tight undergarments that could leave marks during the critical development phase.
Avoid touching your tan and skin-to-skin contact until your water rinse, as oils from your hands can create uneven patches or fingerprints in your developing tan.
Maintenance and Longevity Through Proper Prep
The quality of your initial spray tan prep directly impacts how long your tan will last and how evenly it will fade. Well-prepped skin holds tanning solution more effectively, leading to longer-lasting results that fade gradually and naturally rather than in patches.
Extending Tan Life: The same principles that apply to pre-tan preparation also apply to tan maintenance. Gentle exfoliation, consistent moisturizing, and avoiding harsh products help preserve your tan’s appearance for weeks.
Fading Strategy: When your tan begins to fade, return to gentle exfoliation to encourage even fading and prepare your skin for your next spray tan application.
Professional vs. At-Home Spray Tan Prep
While the fundamental principles remain the same, professional spray tan appointments allow for more precise preparation and application. Professional technicians can identify areas that need special attention and adjust their technique accordingly.
Professional Advantages:
- Expert assessment of your skin type and needs
- Access to professional-grade products and equipment
- Customized preparation recommendations
- Even application technique refined through experience
If you’re considering professional spray tanning, understanding how much does a spray tan cost can help you budget for regular maintenance sessions that keep your glow looking fresh.
Ready to Perfect Your Spray Tan Prep?
Mastering spray tan prep is an investment in achieving the flawless, natural-looking tan you desire. By following these comprehensive preparation guidelines, you’ll maximize your results and enjoy longer-lasting, more even coverage that enhances your natural beauty.
Remember that consistency is key – the more you practice proper spray tan prep techniques, the better your results will become. Each application is an opportunity to refine your approach and achieve even better results than before.
Ready to book your next spray tan appointment? Contact professional spray tan services in your area and mention that you’ve mastered the art of spray tan prep for optimal results.
Sources:


