How to Get Spray Foam Off Hands. Getting spray foam insulation on your hands is one of the most common mishaps during home improvement projects. Whether you’re working on spray foam attic insulation or sealing gaps around your home, accidentally getting this sticky substance on your skin can be frustrating and concerning. Spray foam expands rapidly and adheres strongly to surfaces, including human skin, making removal challenging but not impossible.
The key to successfully removing spray foam from your hands lies in understanding the different states of the foam – wet versus cured – and applying the appropriate removal method. This comprehensive guide will walk you through proven techniques, safety considerations, and prevention strategies to help you tackle this sticky situation effectively.
Understanding Spray Foam and Its Properties
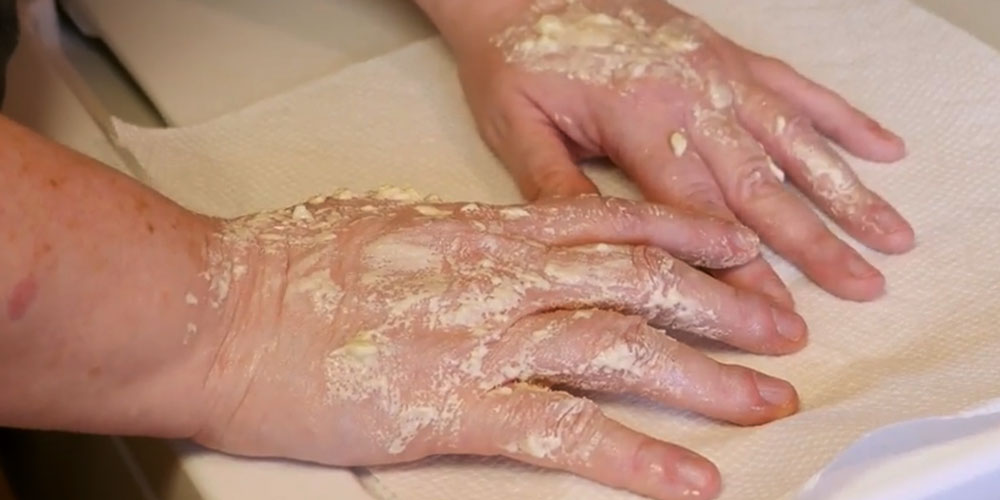
Spray foam insulation is a polyurethane-based product that expands significantly when applied and cures quickly upon contact with air. When spray foam gets on your hands, it begins to cure within minutes, transitioning from a liquid state to a hard, foam-like substance. This rapid curing process is what makes immediate action so crucial when dealing with skin contact.
The chemical composition of spray foam includes isocyanates and polyols, which react to create the expanding foam. These chemicals can cause skin irritation in some individuals, particularly those with sensitive skin or chemical allergies. Spray foam can cause skin irritation, so it is advisable to rinse it off before it dries up on your skin. Understanding these properties helps explain why certain removal methods work better than others and why safety precautions are essential.
Immediate Actions for Wet Spray Foam Removal
When spray foam first contacts your skin and is still wet, you have the best opportunity for easy removal. Acting quickly is crucial because wet foam can be wiped away with minimal effort, while cured foam requires more intensive removal methods. Here’s what to do immediately:
Step 1: Don’t Panic and Avoid Spreading The first rule when spray foam gets on your hands is to avoid rubbing or spreading it to other areas of your body. Keep your contaminated hands away from your face, clothing, and other surfaces. Wet spray foam spreads easily and can contaminate larger areas if not handled carefully.
Step 2: Use a Dry Cloth or Paper Towel Immediately grab a dry cloth, paper towel, or rag and gently wipe away as much wet foam as possible. Work from the outside of the foam patch toward the center to prevent spreading. This initial removal can eliminate 70-80% of the foam before it begins to cure, significantly reducing the difficulty of subsequent removal steps.
Step 3: Apply Acetone or Nail Polish Remover For remaining wet foam residue, acetone-based nail polish remover can be highly effective. Apply a small amount to a cotton ball or cloth and gently dab the affected area. Acetone dissolves the uncured polyurethane components, making removal much easier. However, use this method in a well-ventilated area and avoid prolonged skin contact with acetone.
Methods for Removing Cured Spray Foam from Hands
When spray foam has already cured on your hands, removal becomes more challenging but is still achievable through various methods. Each technique has its advantages and is suitable for different situations and foam thicknesses.
The Soap and Warm Water Method
The safest and most widely recommended method for removing cured spray foam involves using soap and warm water with mechanical scrubbing. This method is particularly effective for thin layers of foam and is gentle enough for sensitive skin.
Materials Needed:
- Warm water (not hot to avoid burns)
- Dish soap or strong hand soap
- Nail brush or scrub brush
- Disposable gloves (optional)
- Pumice stone (for stubborn areas)
Step-by-Step Process: Begin by filling a basin with warm water and adding a generous amount of dish soap. Place your hands inside the gloves and let them soak for about an hour. The warm, soapy water will help loosen the foam, making it easier to scrub off. If using gloves, fill them with the soapy water and wear them as soaking mitts.
After soaking, use a nail brush or soft-bristled scrub brush to gently work at the foam. The key is patience and persistence rather than aggressive scrubbing, which can damage your skin. Work in small sections, applying gentle pressure in circular motions. The foam should begin to break down and peel away in small pieces.
For particularly stubborn areas, a pumice stone can be used with extreme caution. Wet the pumice stone thoroughly and use very light pressure to avoid skin damage. Always follow up with moisturizer after using abrasive methods to prevent skin dryness and irritation.
Petroleum Jelly and Oil-Based Methods
Oil-based products can effectively soften cured spray foam, making it easier to remove mechanically. This method is particularly useful for thicker foam deposits or when the soap and water method proves insufficient.
Petroleum Jelly Technique: Apply the petroleum jelly all over the foam, cover it with a glove or plastic wrap and let it sit until the foam is softened. The petroleum jelly works by penetrating the foam structure and breaking down the polyurethane bonds. After 30-60 minutes of contact time, the foam should peel away more easily.
Alternative Oil Options:
- Vegetable oil or olive oil can substitute for petroleum jelly
- Baby oil is gentler for sensitive skin
- WD-40 can be effective but requires thorough washing afterward
Application Process: Generously apply your chosen oil-based product to completely cover the foam area. Cover with plastic wrap or a disposable glove to prevent the oil from wiping off and to enhance penetration. Allow the oil to work for at least 30 minutes, checking periodically to see if the foam is softening. Once softened, gently peel or scrub the foam away, then wash thoroughly with dish soap to remove oil residue.
Chemical Solvents and Professional Products
For stubborn or thick foam deposits, chemical solvents may be necessary. These products are more aggressive and require careful handling and proper ventilation.
Isopropyl Alcohol (Rubbing Alcohol): Isopropyl alcohol or gasoline – Dissolves dried foam (use with caution). Isopropyl alcohol at 70% or higher concentration can effectively dissolve cured spray foam. Apply with a cotton ball or cloth, allowing it to penetrate for several minutes before gently scrubbing.
Commercial Foam Cleaners: Several commercial products are specifically designed for spray foam removal. These products typically contain solvents formulated to break down polyurethane foam while being somewhat gentler on skin than pure solvents.
Safety Considerations for Chemical Methods:
- Always use in well-ventilated areas
- Wear protective gloves when possible
- Avoid prolonged skin contact
- Keep away from heat sources and open flames
- Wash hands thoroughly after use
Advanced Removal Techniques
Mechanical Removal Methods
When chemical methods aren’t sufficient or advisable, mechanical removal techniques can be employed. These methods require more care to avoid skin damage but can be effective for stubborn foam deposits.
Emery Board or Fine Sandpaper: Using a fine-grit emery board (the type used for nail filing) can help remove small, stubborn foam pieces. For tougher cases, acetone-based nail polish remover does the trick—just keep it away from flames. If all else fails, gently scrape with pumice stones or emery boards and wash up after. Work very gently to avoid skin damage, and always moisturize afterward.
Professional Tools: For extensive foam contamination, professionals sometimes use specialized scrapers or buffing tools. However, these should only be used by experienced individuals as they can easily cause skin damage if used improperly.
Heat-Assisted Removal
Applying gentle heat can soften cured spray foam, making it easier to remove. However, this method requires extreme caution to avoid burns.
Safe Heat Application:
- Use warm (not hot) water soaks
- Apply warm, damp towels to the affected area
- Never use direct heat sources like hair dryers or heat guns on skin
The heat helps expand the foam slightly and can make it more pliable for removal. Always test temperature on a small area first and discontinue if any discomfort occurs.
Safety Precautions and Skin Care
Recognizing Skin Irritation
Spray foam removal can cause skin irritation, particularly with prolonged contact or aggressive removal methods. Watch for signs of irritation including:
- Redness or inflammation
- Itching or burning sensations
- Dry, flaky skin
- Unusual odors or discoloration
If any of these symptoms occur, discontinue removal attempts and consult a healthcare provider if symptoms persist or worsen.
Protective Measures During Removal
Ventilation: Always work in well-ventilated areas when using chemical solvents. Open windows, use fans, or work outdoors when possible to avoid inhaling vapors.
Eye Protection: Keep solvents and foam away from eyes. If contact occurs, flush immediately with clean water and seek medical attention if irritation persists.
Protective Clothing: Wear old clothing or protective garments to prevent spreading foam to clean clothes or other body areas.
Post-Removal Skin Care
After successfully removing spray foam from your hands, proper skin care is essential to prevent irritation and restore skin health.
Immediate Care:
- Wash hands thoroughly with mild soap and warm water
- Pat dry gently with a clean towel
- Apply a moisturizer or skin conditioner immediately
Ongoing Care:
- Monitor the area for signs of irritation for 24-48 hours
- Continue moisturizing regularly for several days
- Avoid harsh chemicals or abrasive activities that might irritate the treated skin
Prevention Strategies for Future Projects
The best approach to dealing with spray foam on hands is preventing contact in the first place. Proper preparation and protective equipment can eliminate the need for removal entirely.
Essential Protective Equipment
High-Quality Gloves: Invest in chemical-resistant gloves specifically designed for polyurethane work. Nitrile gloves provide better chemical resistance than latex or vinyl and are less likely to be penetrated by spray foam. Double-gloving (wearing two pairs) provides additional protection and allows you to remove the outer pair if contaminated.
Protective Clothing: Wear long sleeves, long pants, and closed-toe shoes. Disposable coveralls are ideal for extensive spray foam projects as they can be discarded after use, preventing contamination of regular clothing.
Barrier Creams: Some professionals use barrier creams on exposed skin areas. These products create a protective film that makes foam removal easier if contact occurs.
Workspace Preparation
Ventilation: Ensure adequate ventilation in your work area. Poor ventilation not only creates health hazards but can also affect foam curing and application quality.
Tool Preparation: Have cleaning supplies readily available before beginning work. Keep rags, solvents, and removal tools within easy reach so you can act quickly if accidental contact occurs.
Practice Proper Technique: Take time to practice your application technique on scrap materials before working on your actual project. Confident, controlled application reduces the likelihood of accidental skin contact.
Professional vs. DIY Removal
When to Seek Professional Help
While most spray foam removal can be handled at home, certain situations warrant professional intervention:
Extensive Contamination: If foam covers large areas of skin or has deeply penetrated skin creases and nail beds, professional removal may be safer and more effective.
Allergic Reactions: If signs of allergic reaction or severe skin irritation develop, discontinue home removal efforts and consult a healthcare provider immediately.
Chemical Sensitivity: Individuals with known chemical sensitivities should consider professional removal to avoid exposure to additional chemicals during the removal process.
Cost Considerations
DIY removal costs typically range from $10-30 for supplies including solvents, scrubbing tools, and protective equipment. Professional removal, while more expensive, may be worthwhile for severe cases or when skin safety is a primary concern.
Professional removal services may charge $100-200 depending on the extent of contamination and location. However, this cost must be weighed against the potential for skin damage from improper DIY removal attempts.
Call to Action
Don’t let spray foam ruin your next project! Bookmark this guide and share it with fellow DIYers who need to know how to get spray foam off hands safely and effectively. Remember, prevention is always better than removal, so invest in proper protective equipment before your next insulation project.
Need help with spray foam removal? Try the soap and warm water method first, and remember that patience and persistence are key to successful spray foam removal from hands without skin damage.
Frequently Asked Questions About How to Get Spray Foam Off Hands
What is the fastest way to get spray foam off hands?
The fastest method depends on whether the foam is wet or cured. For wet foam, immediately wipe with a dry cloth followed by acetone or nail polish remover. For cured foam, the petroleum jelly method combined with plastic wrap covering typically works fastest, requiring 30-60 minutes of contact time.
Can I use gasoline to remove spray foam from my hands?
While gasoline can dissolve spray foam, it’s not recommended for skin contact due to safety concerns. Gasoline is highly flammable, toxic, and can cause severe skin irritation. Safer alternatives like isopropyl alcohol or acetone-based nail polish remover are more appropriate for skin contact.
How long does it take for spray foam to cure on skin?
Spray foam typically begins to cure within 5-10 minutes of contact with air and skin moisture. The curing process can be complete within 30-60 minutes, depending on environmental conditions like temperature and humidity. This is why immediate action is crucial for easy removal.
Will spray foam eventually come off on its own?
Cured spray foam will not naturally peel off skin like dead skin cells. However, as your skin naturally sheds over time (typically 2-4 weeks), small pieces of foam may gradually flake away. Waiting for natural removal is not recommended as the foam can cause ongoing skin irritation and interfere with normal skin function.
Is it safe to cut spray foam off my skin with scissors or a knife?
Never attempt to cut spray foam off your skin with sharp tools. This can result in serious cuts, infections, and permanent scarring. The foam often adheres below the surface level, making it impossible to cut safely without damaging skin tissue.
What should I do if spray foam gets under my fingernails?
Foam under fingernails requires patience and gentle techniques. Soak your hands in warm, soapy water for extended periods, then use a soft brush or orange stick to gently work the foam out. Avoid using metal tools or aggressive scraping, which can damage the nail bed.
Can I use acetone on sensitive skin to remove spray foam?
Acetone can be harsh on sensitive skin and may cause irritation, dryness, or chemical burns. For sensitive skin, try the soap and water method first, followed by petroleum jelly techniques. If acetone is necessary, limit contact time and wash thoroughly afterward, followed by moisturizing.
How do I remove spray foam from hairy areas of my hands?
Hair complicates foam removal as the foam can become entangled in hair follicles. Use the petroleum jelly method generously, allowing extra time for penetration. Gently work the softened foam out with your fingers, and be prepared for potential hair loss in heavily contaminated areas.
What household items work best for spray foam removal?
The most effective household items include dish soap, petroleum jelly, vegetable oil, isopropyl alcohol, nail polish remover (acetone-based), baking soda, and pumice stones. Dish soap and petroleum jelly are the safest starting points for most removal situations.
Should I see a doctor after removing spray foam from my hands?
Consult a healthcare provider if you experience persistent skin irritation, signs of infection (redness, swelling, pus), allergic reactions (widespread rash, difficulty breathing), or if you’re unable to remove foam after 24-48 hours of safe removal attempts. Most spray foam removal can be handled safely at home, but professional medical advice is warranted for concerning symptoms.


